© Copyright since 2013. No company, entity, website or individual is permitted to use any part of this website images, materials,
codes, testimonials, product descriptions or reviews for the purpose of gaining from advertisement or marketing for any of our
products or using our products’ information or materials to market to other companies or for search engines to place advertisements
on another website without a written and legally notarized permission from our company. Violation of our copyright is liable to
compensate us for all actual and potential damages, losses, and violations.
All Rights Reserved
Home Vision Privacy Policy GQF products’ return authorization form GQF recommended bird raising tips GQF incubators and
parts return guide GQF chick bator tips GQF egg hatching best practices Chicks’ feeding tips Contact us Accepted payment
methods Warranty guide on GQF incubators, brooders and parts Shipping guide Affiliate Agreement = XML Sitemap Google
Feed


Current Visitors

Chick-Bator Tips
THE STORY OF THE EGGChickens have fathers and mothers just as people
do. The father chickens are called roosters. Mother
chickens are called hens.
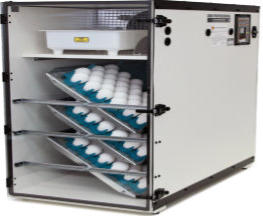
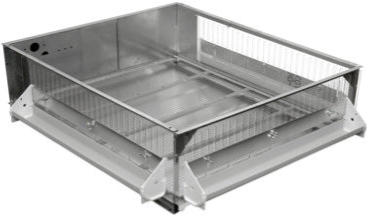
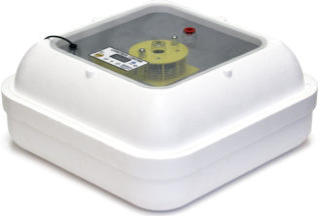
Eggs are laid by hens. When a hen lays an egg she is very proud, and she tells everybody about it in a loud voice: “Cut-cut-cut-caddaw! Cut-cut-cut-caddaw!” This is her way of saying: ‘See what I’ve done! Am I not smart?” And actually, when you stop to think how an egg is made, it’s quite an accomplishment to be able to lay one. The egg starts with a germ spot. This is the small, rather tough white spot you find in our breakfast egg. Next comes the yolk, then four separate layers of white. All of these parts are kept in shape by membranes—very thin layers of transparent “skin.” At the large end of the egg is an air pocket, filled with oxygen. The shell, that looks as though it were solid, is actually porous. That is, there are thousands of tiny holes in it, so small that it is impossible to see them. The egg breathes through these holes. WHAT IS A FERTILE EGG? Before it can produce a baby chick, an egg must be fertile. A hen can lay eggs all her life without laying a fertile one, for in order to produce a fertile egg, a hen must have a husband. The germ spot in the fertile egg is the part that becomes the baby. Before the egg is hatched, the baby is called an “embryo.” The embryo must have food while it is growing. It gets its nourishment from the yolk of the egg. That is why the germ spot is always attached to the side of the yolk. The egg white is a cradle for the growing embryo. If the egg gets bumped accidently, or if it is moved too suddenly, the soft white around the embryo comes between it and the shell and cushions the shock. DON’T SCRAMBLE YOUR EGG! A fertile egg is so delicate that it can be ruined by small mistakes. Sometimes a perfectly good egg won’t hatch because it has been turned wrong end up, or shaken. If an egg gets cold or too warm, the embryo won’t develop correctly. Experienced poultry men never expect to have every egg in the incubator hatch. KEEP YOUR YOLK IN PLACE! A mother hen reaches underneath her body and turns her eggs frequently with her beak. This is because the egg yolk tends to float toward the shell. When the egg lies too long in one position, the white separates and allows the yolk to float through, forcing the germ against the shell and killing it. The mother hen avoids this by changing the position of her eggs. Remember, the Chick Hatcher takes the place of a mother hen. When a hen has babies, she sits on the eggs until they hatch. She keeps them warm by spreading her soft feathers over them. She is very careful with them and won’t let anyone else touch her eggs. PREPARING YOUR CHICK HATCHER IT’S UP TO YOU The creation of life is a complex and mysterious process. From the moment you place an egg in your Chick Hatcher, you will be partly responsible for the creation of a life. If you make mistakes, your chick will die inside the egg. Statistics show that under ideal conditions, about 75% of fertile eggs hatch successfully. On some farms, only about 49% hatch. The Chick Hatcher is scientifically designed to give as near ideal conditions as possible. Now it is up to you to follow instructions very carefully, so that the egg you put in your Chick Hatcher will develop into a healthy, happy little chick. STEP I: LOCATION OF CHICK HATCHER Once you have put an egg into the incubator it should not be moved; so it is wise to select a location before using it. It is best to place your Chick Hatcher at about eye level. DON’T PLACE YOUR CHICK HATCHER NEAR A GAS HEATER: Carbon dioxide from gas will kill an embryo. IN A DRAFT: An embryo develops pneumonia easily. Avoid a spot where wind will blow directly on the Chick Hatcher. NEAR A HEATER: Too much heat can kill an embryo. IN A COLD ROOM: The Chick Hatcher is built to maintain proper incubation temperature in a moderately heated room (72° is deal). The heating unit cannot provide sufficient warmth in a freezing room. STEP. 2. ATTACHING LIGHT TO BOWL Plug in extension cord to test light. Place screw through hole from outside of bowl and screw into threaded metal projection of bulb socket. Attach firmly with bulb unit facing away from notched rim of bowl. Match notched portion of top dome with notched rim of bowl and make sure top dome always fits securely into bottom bowl section. BE PREPARED! Get a 7 Watt Light Bulb from the Five & Ten Cent Store in case the bulb in Chick Hatcher should burn out. STEP 3. LINING Cut the square piece of aluminum foil (approximately 6" x 6") in-to two pieces, each about 3" x 6", which are used to line the bottom to assist in adjusting the temperature. Put one piece in bottom of incubator so that one end comes up behind the light bulb and about mid way of the bulb, and other end goes up the other side of the bottom. It is important that one end of the foil is about mid way of the light bulb. In the event there is difficulty in getting the temperature up high enough, the other piece of foil can be placed in the bottom running across the piece that goes behind the light. STEP 4: WIRE RACK AND SHIELD FOR EGGS Your Chick Hatcher is equipped with the a UNIVERSAL WIRE RACK to hatch all kinds of eggs. Follow the same instructions for quail and game bird eggs as is shown for chicken eggs. The UNIVERSAL WIRE RACK bends 90 degrees in the middle. The side with the aluminum foil heat guard must be between the light and the eggs, as in the sketch. STEP 9: MIRACLE OF BIRTH As the given number of days approaches the chick is almost fully developed. He turns slowly inside the egg shell, and begins to peck it with his beak. It can take him up to as long as 20 hours after the first peep to break out of the shell. All this time he keeps turning and pecking, until he has pecked a circle clear around the large end of the egg. Hands Off Don’t touch the Chick Hatcher. Just watch through the dome if you want to see your chick. He’s very weak after the effort of being born. He’ll probably lie close to the egg for about eight hours before he starts moving around. He’s an ugly little thing, with his feathers all stuck down. He looks like nothing but great claws and beak. Don’t Touch Don’t try to feed him until he is completely dry and moved from incubator. STEP 10: A HOME FOR YOUR CHICK While your chick is resting and gaining strength, you should prepare his future home. Secure a cardboard box approximately 2 feet square. Sprinkle straw in the bottom about an inch deep. When the chick starts acting as though he wants to walk, it’s time to put him in his box. Make a slit in the corner of the box, about 4 inches from the bottom and extending about 8 inches along each side. Lift the chick very gently from his Chick Hatcher—DON’T SQUEEZE—and put him into the box. Now work quickly so he won’t get chilled. Empty the Chick Hatcher bowl and turn upside down. Keep the light turned toward the center of the box. Push the rim of the bowl into the slit in the box corner until it is steady and secure. Now PLUG IN THE LIGHT. Ideal temperature in area of light is 100° F. but other areas of box should be cooler. When hatching several eggs, often there will be a difference in the time the chicks will hatch. In this case, you may hang a 25 or 40 watt bulb over your brooder box while the Chick Hatcher bowl is still being used for incubation. The bulb should be hung over one corner about 6 inches above the brooder bottom. After all chicks hatch the Chick Hatcher bowl can then be set as directed. STEP 11: FOOD AND WATER Fill a small jar lid with fresh water. Add gravel or marbles to the water to keep the chick from drowning. Lay the water lid in a corner of the box and put a dish of food beside it. Use a starting mash from the feed store. Do not feed the chicks seeds or hard course feed. STEP 5: REGULATING TEMPERATURE Plug cord into receptacle to turn light on. Place thermometer on wire rack about one inch from and parallel to the heat shield. Put dome on the base with notch in top aligned with notch on base. When thermometer stops and levels off, this will be the temperature in the incubator. The desired temperature is 100 degrees, but a range between 98 and 102 degrees is acceptable. If temperature is slightly high, it may be lowered by tilting the bulb up towards the top of dome and also by sliding the foil down towards the bottom of the base, or removing the foil. If temperature is slightly low, it may be increased by tilting the bulb down towards the bottom, sliding the foil up higher behind the bulb or putting extra foil strip in bottom (running across the one that goes behind the bulb) to come up on sides of bottom and laying strips of foil over the dome. If room temperature is between 70 and 74 degrees F. you will be able to adjust temperature to stay just about the 100 degrees desired. STEP 6: HUMIDITY AND VENTILATION CHICKS NEED MOISTURE! Heat from the bulb tends to dry the air which in turn dries the egg. Put water during the incubation in one of the hollow legs. It is extremely important that water is in one leg during the time of hatch, otherwise the chick will dry off before he gets out of the shell and his feathers will stick to the shell. CHICKS NEED TO BREATH! Even while inside the egg the little chick must have plenty of air to breath. In order for the egg to absorb oxygen, the incubator must have proper circulation of air. The dome has a hole in the top to provide this ventilation, so be sure that it is not obstructed or closed up. STEP 7: PLACING EGG IN INCUBATOR When you have located, prepared and tested your Chick Hatcher you are ready to put in the eggs. Place the eggs on the wire rack, in the center and close to the heat shield, with the large end tilted slightly up. Inside the shell the chick grows with its head at the large end of the egg where the air pocket is located. If you stand the delicate little chick on its head it will not live. So keep this in mind: always lay egg on side with the LARGE END SLIGHTLY UP. Place thermometer on top of eggs about one inch from and parallel to the heat shield. STEP 8: KEEP YOUR YOLK IN PLACE Eggs must be turned regularly to prevent the yolk from settling to one side and to exercise the egg embryo. When you turn the egg, the embryo gets its exercise by turning in the shell until its head is upright. In the chick Hatcher the eggs should be turned at least twice a day. To turn the egg, pick it up very gently, turn it end over end so that small end is pointing in the opposite direction. A small “X” and “0” on opposite sides is an aid in keeping up with the turning. Three days before eggs are due to hatch, stop turning the eggs. They should not be disturbed during hatching time. Different types of eggs take different lengths of time to hatch, as follows: Quail Cortunix - 17 to 18 days (speckled eggs) Chukar - 23 days Bobwhite - 23 days (white eggs) Turkey - 28 days Pheasant -23 days Duck -28 to 33 days Chickens - 21 days Goose -28 to 30 days Be gentle at all times. NEVER touch your egg except to turn it. When you turn it, be careful not to jerk or jar it. Replace dome quickly. NOW IF ALL GOES WELL, YOU WILL SOON HAVE YOUR OWN DOWNY LITTLE BABY CHICK! STEP 12: KEEP IT HOT Your chick will need plenty of heat for the first few days. Keep the brooder over him with the light on. If he gets too warm he’ll move. When you get acquainted with him you can tell whether he’s happy or sleepy or angry by the tone of his plaintive little “CHEEP! CHEEP!” Don’t handle him for a few days and when you do finally pick him up, be very careful NOT TO SQUEEZE or FRIGHTEN HIM. See that he always has clean food and water and he’ll be a wonderful little pet. LEST YOU FORGET 1. Be sure the egg you put in your Chick Hatcher is fertile. 2. Select a place for your Chick Hatcher where it will be out of drafts and not too close to a gas heater. 3. Prepare liner and fit it into bottom of Chick Hatcher tearing away or folding down foil for water supply in humidifier. 4. Place fresh WATER in humidifier. 5. Plug in extension cord and test LIGHT. 6. Place egg in egg rack LARGE END TILTED SLIGHTLY UP. 7. TURN EGG 1 turn at least twice a day. 8. When chick begins to peep, do not open until after hatch. 9. After chick is born LEAVE HIM ALONE until he begins moving around and looks fairly dry. Then place him in box. 10. Turn bowl of Chick Hatcher into brooder by placing it upside down and forcing rim into slit at corner of box, approximately 4 inches from bottom of box. 11. Place food and water in box. (get starting mash from local feed dealer.) 12. Keep brooder light lit until chick is big and strong enough to survive. (About 6 weeks.) BE KIND TO YOUR PET DON’T NEGLECT YOUR CHICK: Be sure that your Chick always has WATER, FOOD and a clean home. When he gets too big for the house DON’T TURN HIM LOOSE. If you don’t have the facilities for caring for him properly it is suggested that you give him to a local hatchery, farm, Humane Society, Feed or Pet Dealer. TEMPERATURE TIPS COLD: In room temperatures of 64°F to 69° F may compensate for these lower temperatures by placing a piece of kitchen aluminum foil (6¾” x 6¾”) over dome of Chick Hatcher. Shape and trim so that window is clear. Do not discard the egg if your temperature drops for a short period of time. The embryo may survive if returned to incubating temperature. HOT: In room temperatures of 75°F to 79°F Remove aluminum foil from bottom of bowl. Do not remove shield. If room temperatures exceed 80°F, pull plug from socket to turn off bulb periodically. Under high temperature conditions the temperature inside Chick Hatcher should be checked by hanging thermometer with scotch tape to inside of dome so that bulb of thermometer is at same height as top of eggs. Ideal incubating temperatures are from 97°F to 101°F Temperatures of 103 °or more will kill embryo. HOW TO GET YOUR FERTILE EGG CHICKEN, DUCKS, TURKEY AND OTHER FARM YARD FOWL—Write to your State Agriculture Department, capitol of your state and neighboring states and request names of producers of eggs you desire. GAME BIRD EGGS—Write to State Game and Fish Commission, capitol of your state and neighboring states and request names of producers of eggs you desire. BOB WHITE AND CORTUNIX QUAIL EGGS may be obtained from GQF Company.
Payment processed by PayPal using any credit card or electronic bank account. Note, you do not
need to be a member of our payment system. You can pay as a guest of PayPal. On PayPal
payment final step, you can change the default currency to the one you prefer.
For further questions, please, email us.